Dewaxing and burnout are the stages that turn a ceramic-coated pattern into an empty, heat-resistant casting mold.
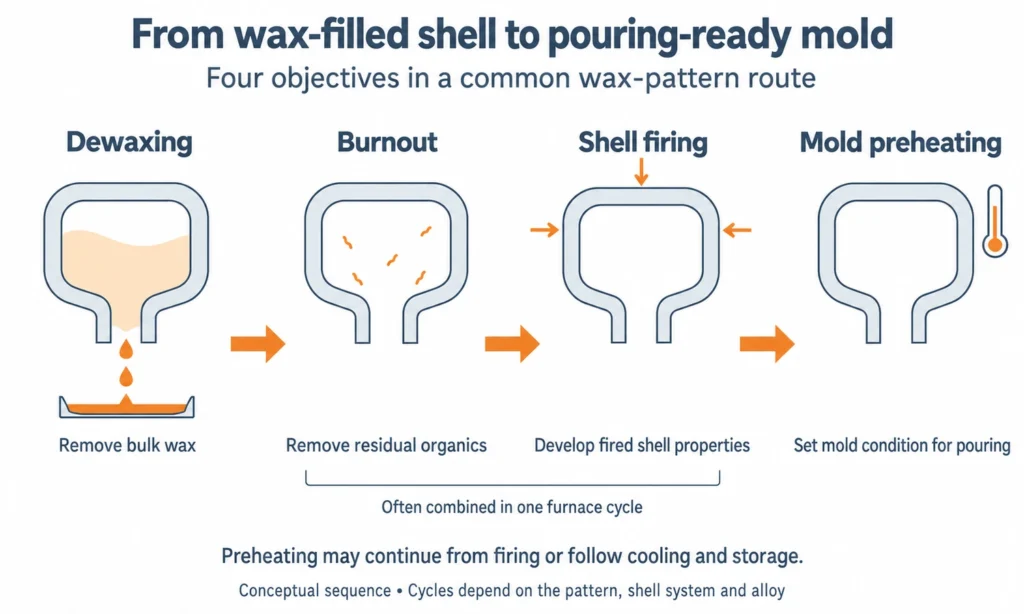
They are often grouped together, but they do different jobs. Dewaxing removes the bulk of the sacrificial pattern. Burnout removes residual pattern material and organics, while shell firing prepares the ceramic mold for metal pouring.
The distinction matters because poor pattern removal can crack the shell, leave carbon or wax residue, generate gas during pouring, and turn a good wax pattern into a defective casting.
Dewaxing vs. Burnout: Purpose and Process Difference
In industrial investment casting, dewaxing and burnout are closely related but should not be treated as interchangeable terms.
| Stage | Main Purpose | What Happens |
|---|---|---|
| Dewaxing | Remove most of the wax or sacrificial pattern | Wax melts and drains from the ceramic shell |
| Burnout | Remove residual wax, polymers, and other organic material | Remaining pattern material is oxidized or thermally decomposed |
| Shell Firing | Thermally condition and strengthen the ceramic mold | Ceramic binder and refractory system develop their fired properties |
| Mold Preheating | Bring the shell to the required pouring condition | Mold temperature is adjusted before molten metal enters |
The stages may occur in separate equipment or may overlap within the same thermal cycle.

The Investment Casting Institute’s dewax and burnout guidance describes a common industrial route in which a steam autoclave removes most of the wax and a subsequent furnace cycle burns away residue and cures the shell.
This is different from simply heating a wax tree until nothing visible remains. Each step has to protect the ceramic shell while leaving a clean cavity suitable for molten metal.
Where Dewaxing and Burnout Fit in Investment Casting
Before dewaxing, the wax tree has already been covered by multiple ceramic layers.
The process sequence is roughly:
wax patterns → tree assembly → ceramic shell building → drying → dewaxing → burnout / shell firing → mold preheat → metal pouring
Our broader Investment Casting Process guide covers the complete production sequence. Investment Casting Process guide
At the dewax stage, the shell already contains the exact negative geometry needed for the casting, but the cavity is still occupied by wax.
Removing that wax without damaging the ceramic mold is the first challenge.
The second challenge is making sure the remaining shell is clean, dry, thermally stable, and at the correct condition for pouring.
Steam Autoclave Dewaxing
A steam autoclave is one of the most common industrial methods for removing conventional investment-casting wax.
The shell is placed inside a pressure vessel and exposed rapidly to hot pressurized steam.
The goal is not to warm the entire wax pattern slowly.
Wax expands significantly when heated and conducts heat relatively poorly. If the whole pattern begins expanding before it can escape, it pushes outward against the ceramic shell and can crack it.
Rapid steam heating works differently.
Heat reaches the wax-shell interface quickly, melting the outer layer of wax first. The liquid wax can then move away from the shell and drain through the gating system, creating space for the remaining pattern to expand.

The Investment Casting Institute’s Atlas of Shell Defects identifies rapid heat input as a key principle in successful autoclave dewaxing for exactly this reason. (ICI Atlas of Casting Defects)
Autoclave dewaxing also has a practical material advantage: much of the removed wax remains recoverable rather than being completely burned.
That wax can be collected, cleaned, reconditioned, and reused where the foundry’s wax-control procedure allows.
Flash-Fire Dewaxing
Flash-fire dewaxing removes the pattern by placing the ceramic shell into a hot furnace rather than using pressurized steam.
The sudden heat melts and burns the pattern material while the ceramic shell remains in place.
In some foundries, flash fire is the primary dewaxing route. In others, it follows autoclave dewaxing and serves mainly to remove residual wax and begin shell firing.
ICI describes both approaches and notes that many foundries use autoclave and flash-fire processing together. (ICI dewax guidance)
Flash fire has an important role when the sacrificial pattern does not behave like ordinary foundry wax.
Some polymer patterns do not melt and flow from the shell in the same way as injected wax. They may instead soften, decompose, or burn inside the mold.
That difference becomes particularly important with additive-manufactured patterns.
Burnout, Shell Firing, and Mold Preheating
After the bulk pattern has been removed, the shell is not necessarily ready for metal.
Small amounts of wax, fillers, carbonaceous residue, moisture, and other organic material can remain inside the mold.
Burnout removes these residues.
Shell firing performs another job at the same time or in a related furnace cycle: it thermally conditions the ceramic structure so the mold can survive contact with molten metal.
A fired shell needs sufficient strength and thermal stability to withstand handling, pouring, and the rapid temperature change that occurs when metal enters the cavity.
Mold preheating then establishes the temperature required for the actual pour.
A hot shell helps prevent the first metal entering the cavity from freezing too early, which is especially important for thin sections and long flow paths.
The exact relationship between burnout, firing, and preheating varies with shell system and foundry layout. Some processes combine them closely; others cool, inspect, repair, or store shells before a separate preheat cycle.
What matters is that three separate outcomes are achieved:
a clean cavity + a fired ceramic mold + the correct mold temperature for pouring.
Wax Expansion and Ceramic Shell Cracking
Shell cracking is one of the main reasons dewaxing requires process control.
The ceramic shell and wax pattern respond to heat very differently.
As the pattern warms, wax expands before it becomes fully liquid. The shell surrounding it has much less freedom to expand.
If pressure builds faster than the wax can melt and escape, the shell can crack from the inside.
This can later appear on the casting as a fin or larger area of excess metal because molten alloy fills the shell crack during pouring.
The ICI defect atlas specifically links shell cracking and excess-metal defects to dewax performance. (ICI Atlas of Casting Defects)
Shell condition before dewaxing matters as well.
A shell that has not dried sufficiently can be more vulnerable to damage. Rapid steam formation from retained moisture can contribute to delamination or cracking during thermal processing.
This connects dewaxing directly to the preceding shell-building stage. A good autoclave cycle cannot fully compensate for a poorly built or incompletely dried ceramic mold.
For the shell-building side of that relationship, see our Ceramic Slurry in Investment Casting guide.
Injected Wax vs. 3D-Printed Sacrificial Patterns
Pattern material changes the dewax and burnout strategy.
Traditional injected wax is well suited to steam autoclave dewaxing because it softens and melts readily enough for the bulk material to drain from the ceramic shell.
Printed sacrificial patterns can behave differently.
Some systems use actual printed wax or wax-like material. Others use PMMA, SLA resins, or other polymers designed to disappear during thermal processing.
These materials should not automatically be treated as conventional wax.
An ICI comparison presented at the 2024 Technical Conference illustrates the difference clearly. In that study, injected and printed wax patterns went through autoclave dewaxing followed by burnout, while the tested SLA and PMMA patterns used venting and went directly to the burnout stage rather than following the same autoclave route.
ICI research has also documented shell cracking caused by thermal expansion of printed patterns during autoclave dewaxing. (ICI paper on printed-pattern forces during autoclave dewaxing)
The practical lesson is simple:
The pattern-removal process has to match the pattern material.

This is one reason the term 3D-printed wax pattern can be misleading when the printed material is actually a polymer.
Our Wax Patterns guide explains the difference between injected wax and printed sacrificial patterns in more detail.
Defects Related to Incomplete Dewaxing or Burnout
Incomplete pattern removal can affect casting quality even if the ceramic shell remains intact.
Residual wax or polymer material can decompose when molten metal enters the shell, creating gases and combustion products inside the cavity.
The ICI casting-defect atlas lists excess wax and filler material remaining after dewaxing as one possible cause of gas-related defects and recommends complete burnout before preheat. (ICI Atlas of Casting Defects)
Carbon residue can also contaminate the mold surface or interact with the alloy.
For printed patterns, ash can become another concern because some polymers leave more solid residue than conventional wax.
These defects should not be confused with shrinkage porosity.
Shrinkage develops because solidifying metal cannot receive enough liquid feed metal. Gas generated by pattern residue is a completely different mechanism.
That distinction is covered more fully in our Investment Casting Defects guide.
Wax Recovery After Dewaxing
One advantage of steam autoclave dewaxing is that much of the pattern material leaves the shell as recoverable wax rather than combustion products.
ICI notes that wax removed by autoclave can be reconditioned and reused. (ICI dewax guidance)
Reuse still requires control.
Recovered wax may contain ceramic particles, moisture, assembly wax, dirt, or other contamination. Its properties can also differ from virgin pattern wax after repeated thermal history.
Foundries therefore separate, filter, condition, or blend recovered material according to their own qualified wax-management system.
A foundry may use reclaimed wax in runners, gates, or other less dimensionally sensitive applications rather than automatically returning all recovered material to critical production patterns.
The broader distinction between pattern wax, runner wax, and printed sacrificial patterns is covered in our Investment Casting Wax guide.
Process Controls During Dewaxing and Burnout
The most important process variables are not one universal autoclave pressure or burnout temperature.
They are the conditions that determine whether the shell reaches pouring in a clean and undamaged state.
| Process Area | What the Foundry Needs to Control |
|---|---|
| Shell condition before dewax | Drying completion, shell strength, visible damage |
| Dewax heat input | Fast enough pattern release to limit internal expansion stress |
| Wax drainage | Clear paths for melted material to leave the shell |
| Autoclave depressurization | Controlled pressure release to avoid damaging the shell |
| Burnout completeness | Removal of residual wax, polymer, fillers, and carbonaceous material |
| Shell firing | Qualified thermal cycle for the ceramic system |
| Pattern material | Compatibility with autoclave, flash-fire, or another approved removal route |
| Preheat condition | Mold temperature suitable for the alloy and casting geometry |
The exact cycle belongs to the qualified shell and pattern system.
Copying another foundry’s autoclave pressure, furnace temperature, or hold time without matching its wax, shell permeability, geometry, furnace design, and alloy does not create the same process.
ICI treats dewax, burnout, and casting as dedicated process-control areas for this reason. (ICI dewax guidance)
In our in-house silica-sol investment-casting workflow at YTD, dewaxing and shell baking sit between ceramic shell building and melting/pouring. We treat them as part of the complete mold-preparation route rather than as an isolated wax-removal step.
What Buyers Need to Specify
Most casting buyers do not need to specify an autoclave pressure, burnout temperature, or furnace recipe.
Those are foundry process controls unless the part is governed by a qualified customer specification that explicitly defines them.
The drawing and purchase requirements are usually better focused on the result:
the correct alloy, dimensional requirements, surface condition, internal-quality requirements, heat treatment, inspection, and any special cleanliness or certification requirements.
For a project using printed sacrificial patterns, it is also worth confirming that the foundry has a qualified removal route for that particular pattern material.
The buyer needs a clean, intact, production-ready ceramic mold.
How the foundry achieves that should come from a controlled process rather than a thermal recipe copied from another casting.
Final Thoughts
Dewaxing and burnout are separate parts of preparing an investment-casting shell for molten metal.
Dewaxing removes the bulk pattern while protecting the ceramic shell. Burnout removes residual material, and shell firing prepares the mold for the thermal load of pouring. The correct route depends on the shell system and pattern material—especially when 3D-printed sacrificial patterns replace conventional wax.
Good control at this stage leaves one thing behind: a clean, intact ceramic cavity ready to become the casting.
FAQs
What Is the Difference Between Dewaxing and Burnout?
Dewaxing removes the bulk of the sacrificial wax pattern. Burnout removes residual wax, polymers, fillers, and other organic material left inside the ceramic shell after dewaxing.
Why Is an Autoclave Used for Investment Casting Dewaxing?
Pressurized steam transfers heat rapidly to the wax-shell interface. This melts the surface wax so it can drain before the remaining pattern expands enough to place excessive pressure on the ceramic shell.
Is Burnout the Same as Shell Firing?
They often occur during the same furnace cycle, but they describe different objectives. Burnout removes residual pattern material; shell firing thermally conditions the ceramic mold.
Why Can Dewaxing Crack a Ceramic Shell?
Wax expands as it heats. If that expansion occurs faster than the wax can melt and escape, internal pressure can crack the surrounding ceramic shell.
Do 3D-Printed Patterns Use the Same Dewaxing Process as Wax?
Not always. Printed wax can sometimes follow a conventional wax route, while SLA, PMMA, and other polymer patterns may require venting or direct furnace burnout. The removal process needs to match the pattern material.
Can Wax Removed During Dewaxing Be Reused?
Yes. Steam-autoclave wax can often be collected and reconditioned, although reuse depends on contamination, wax properties, and the foundry's qualified wax-management system.