DIY investment casting can turn a wax or 3D-printed pattern into a real metal part, which makes it attractive for jewelry, art pieces, prototypes, and one-off components.
The basic idea is simple: surround a sacrificial pattern with a heat-resistant mold, remove the pattern, and fill the cavity with molten metal. The difficult part is controlling burnout, mold strength, metal temperature, filling, and safety well enough to produce a sound casting.
This guide explains what a practical DIY setup involves and where its limits begin.
What DIY Investment Casting Usually Means
Investment casting and lost-wax casting describe the same basic manufacturing principle: a disposable pattern creates a mold cavity and is removed before metal pouring.
Industrial foundries usually produce wax patterns with reusable tooling, assemble them into trees, and build ceramic shells around them. The Investment Casting Institute describes this sequence as wax pattern production, tree assembly, ceramic shell building, dewaxing, and metal pouring.
DIY investment casting often uses the same principle in a simpler form.
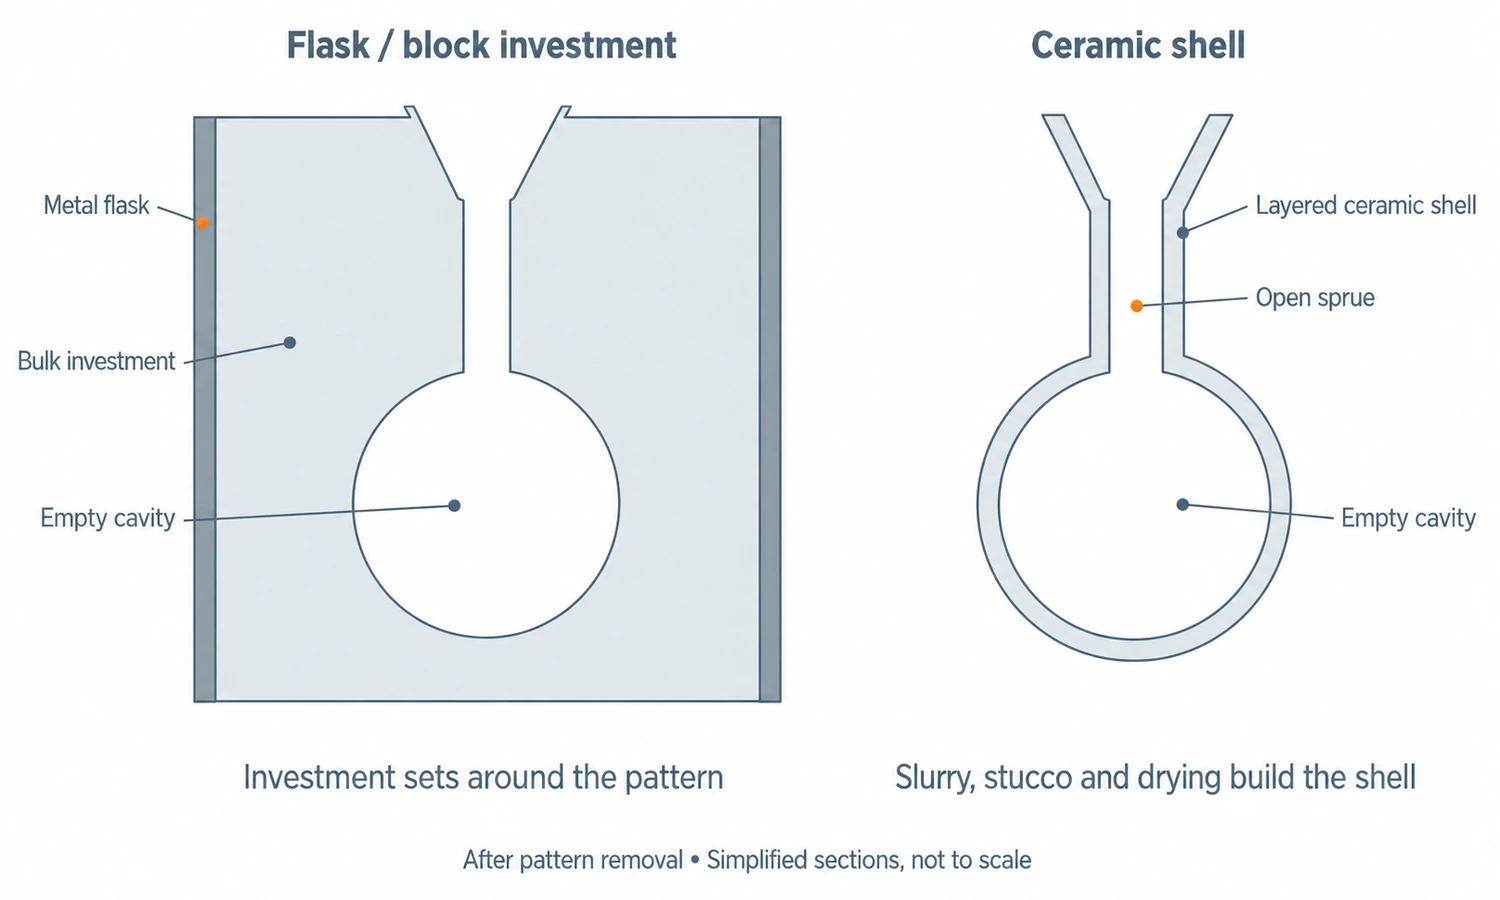
For jewelry and very small parts, hobbyists commonly place the pattern inside a flask and surround it with a purpose-made investment material. After burnout, the complete block becomes the mold.
Larger hobby and art castings may use a ceramic shell built directly around the pattern, which is closer to the industrial process.
So “DIY investment casting” can describe two different mold systems:
| DIY Method | Typical Use | Mold Construction |
|---|---|---|
| Flask / block investment | Jewelry and small parts | Investment material surrounds the pattern inside a flask |
| Ceramic shell | Larger or more complex patterns | Repeated ceramic slurry and refractory layers form a shell |
Both rely on a sacrificial pattern. The way the mold is built around that pattern is different.
The Basic DIY Investment Casting Process
A successful casting begins long before metal is melted.
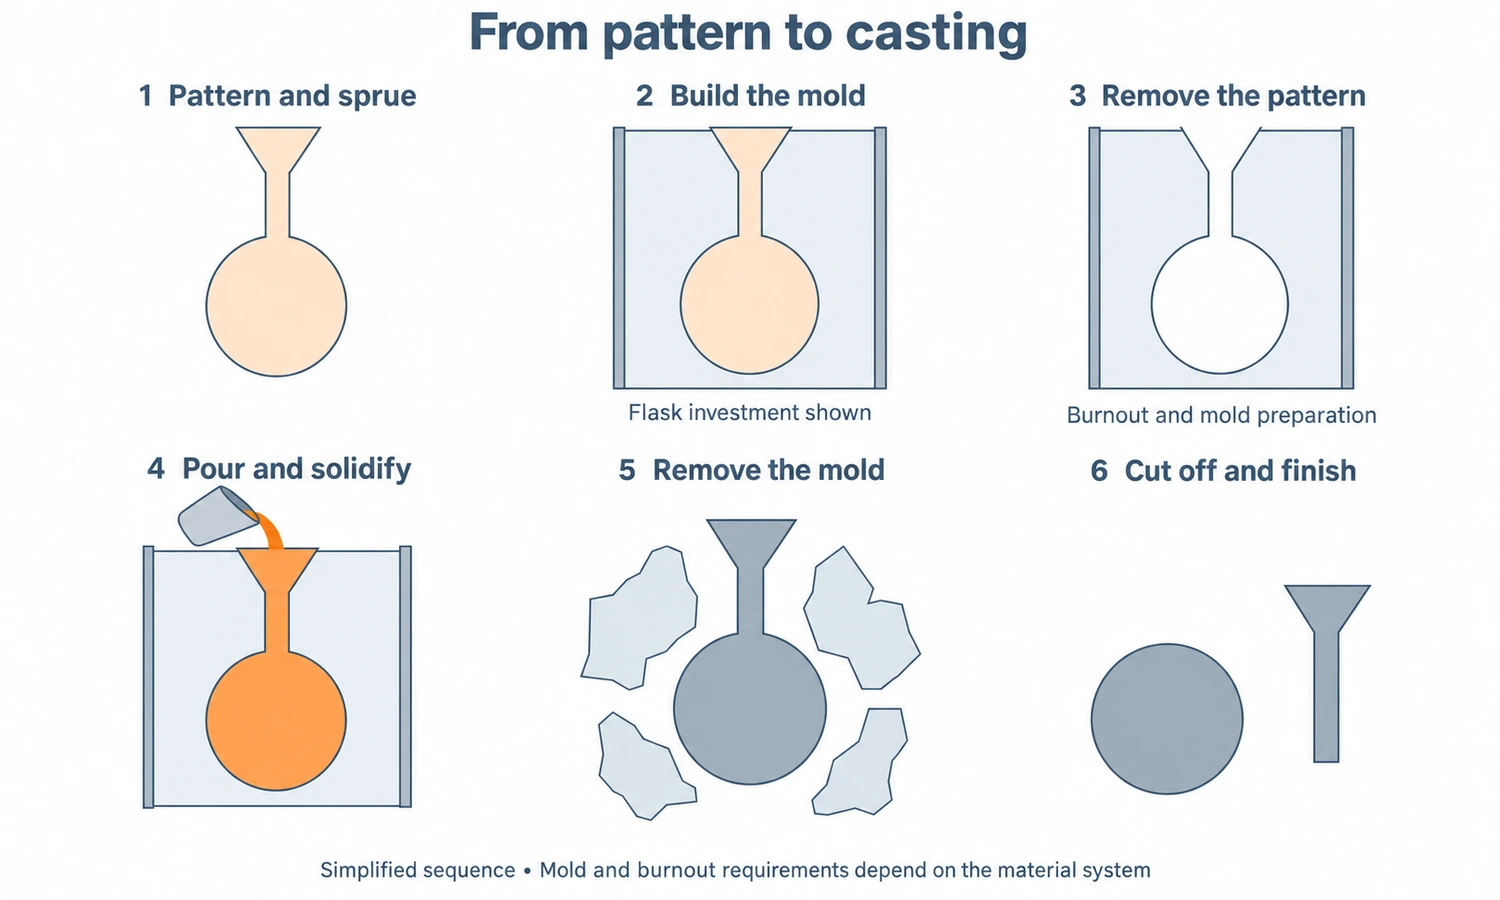
First, a sacrificial pattern is made in the exact geometry that should appear inside the mold. A sprue and gate are then added so molten metal has a controlled path into the part.
The pattern is surrounded by refractory mold material. In a flask process, investment material is poured around the pattern. In ceramic-shell casting, the pattern is repeatedly coated with slurry and refractory stucco until a strong shell has formed.
The pattern must then be removed completely. Industrial investment casting commonly uses steam dewaxing followed by burnout to remove residual wax and prepare the shell.
Once the mold is clean and properly prepared, it is heated to the condition required for pouring. Molten metal enters through the sprue and fills the cavity left by the pattern. After solidification, the investment or ceramic shell is removed and the part is cut from its gating system.
The overall sequence is therefore:
pattern → sprue and gating → refractory mold → burnout → mold preparation → metal pouring → mold removal → finishing
Our Investment Casting Process guide explains how the same basic stages are controlled in industrial production.
Wax and 3D-Printed Patterns for DIY Investment Casting
A DIY pattern does not have to come from production tooling.
Traditional lost-wax work can begin with a hand-carved wax model. If several identical pieces are needed, wax can also be reproduced from a small pattern mold.
Additive manufacturing gives hobbyists another route.
The Investment Casting Institute recognizes printed sacrificial patterns as an alternative to conventionally injected wax patterns.
This is the basis of what is often called lost-PLA casting, although PLA is only one of several printable pattern materials.
The important requirement is not simply that the pattern can be printed. It must also leave the mold cleanly during burnout without cracking the investment or leaving enough ash and residue to damage the casting.
Materials developed specifically for investment casting are generally easier to qualify than assuming any 3D-print filament or resin will behave like wax.
At YTD, we also use 3D-printed sacrificial patterns for suitable prototype projects. The scale and process control are industrial, but the basic advantage is the same: a printed pattern allows us to make a casting without first manufacturing production wax tooling.
For more on the pattern itself, see our Wax Patterns in Investment Casting guide.
Flask Investment and Ceramic Shell for DIY Casting
The choice between block investment and ceramic shell changes much of the DIY setup.
Flask or Block Investment
A flask process is common for jewelry and small detailed pieces.
The pattern and sprue sit inside a container, and a pourable refractory investment surrounds them. Once the material sets and the pattern is burned out, the complete investment block contains the casting cavity.
This approach is compact and well suited to small components.
The mold is relatively heavy, however, and burnout has to remove the pattern from a fairly enclosed cavity.
Ceramic Shell
A ceramic shell is built directly on the pattern surface.
The Investment Casting Institute describes industrial shell building as repeated dipping into ceramic slurry followed by refractory stucco and drying. Multiple layers create a laminated shell strong enough to survive later casting operations.
Ceramic shell becomes more attractive as parts get larger or when building one large solid investment block would become inconvenient.
It also introduces more process variables. Slurry condition, coating coverage, drying between layers, shell thickness, and pattern burnout all affect the result.
Our Ceramic Slurry in Investment Casting article explains why slurry, stucco, drainage, and drying have to work as one system.
Equipment Needed for DIY Investment Casting
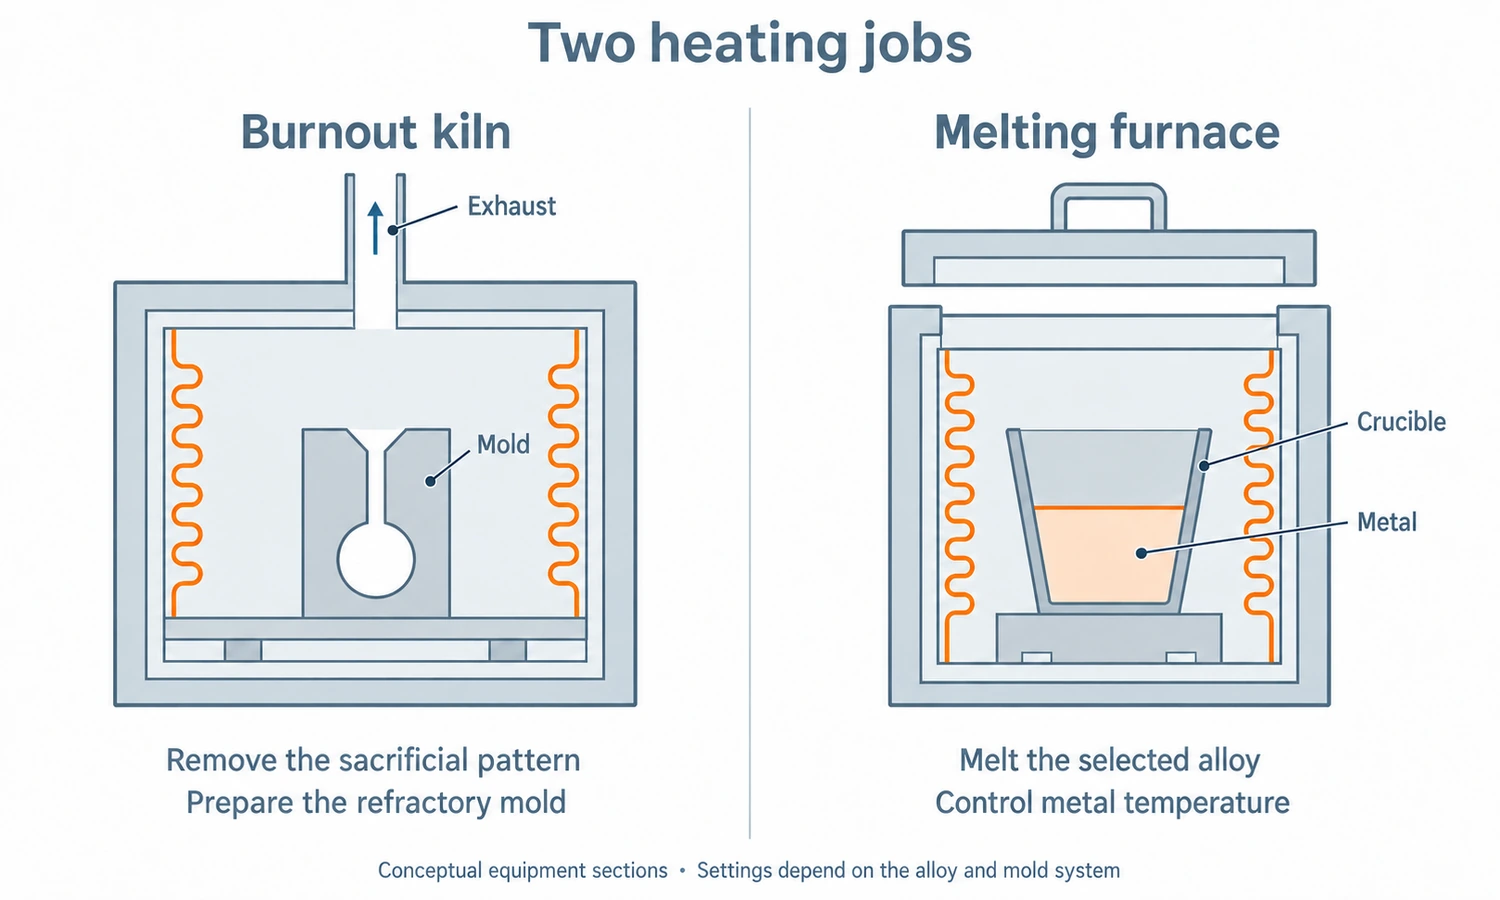
A DIY setup needs equipment for three separate jobs: preparing the mold, removing the pattern, and melting and pouring the alloy.
| Equipment Area | Purpose |
|---|---|
| Pattern-making tools or 3D printer | Produce the sacrificial pattern |
| Investment flask or ceramic-shell materials | Create the refractory mold |
| Burnout kiln | Remove the pattern and prepare the mold |
| Metal-melting furnace | Melt the selected alloy |
| Proper crucible and pouring tools | Contain and transfer molten metal |
| Temperature-control equipment | Monitor kiln, mold, and metal conditions |
| Vacuum equipment, where used | Reduce bubbles in investment or assist filling in some small casting systems |
| Ventilation and suitable PPE | Control heat, fumes, dust, and splash hazards |
Vacuum or centrifugal casting equipment is common in small jewelry systems because very small cavities can be difficult to fill by gravity alone. Larger hobby castings may use gravity pouring.
The furnace and kiln are different pieces of equipment. One prepares the refractory mold; the other melts the metal.
For a beginner, purchasing equipment designed and rated for these jobs is safer than improvising vessels, burners, or pouring tools whose temperature limits and failure modes are unknown.
Metals Suitable for Hobby Investment Casting
DIY casting becomes harder as alloy melting temperature and process sensitivity increase.
Jewelry lost-wax systems commonly work with precious-metal alloys. Hobby foundries also cast aluminum and some copper-based alloys when the equipment and ventilation are appropriate.
Aluminum is attractive because its melting requirements are much more accessible than steels, while still allowing useful functional components to be produced.
Copper alloys require more heat. Alloy chemistry also matters: metals containing volatile elements can create additional fume hazards during melting.
Steel, stainless steel, and high-temperature superalloys belong to a very different level of process control. Their higher melting temperatures place greater demands on furnaces, crucibles, refractory systems, pouring equipment, atmosphere control, and worker protection.
They are not sensible starting materials for a typical home investment casting setup.
At YTD, materials such as stainless steel and suitable nickel- or cobalt-based alloys are handled through controlled industrial investment casting equipment rather than hobby-scale methods.
Sprues, Gates, and Wax Trees in DIY Casting
A detailed pattern can still produce a bad casting if molten metal cannot reach it properly.
The sprue connects the pouring area to the casting cavity. Gates control where metal enters the part.
For several small patterns, individual pieces can be attached to a common central sprue to create a wax tree. The Investment Casting Institute notes that this allows several patterns to share one mold while the sprue later becomes the main metal-flow path.
DIY casters often underestimate this part of the process.
A gate is not just extra wax that gets cut off later. Its size and position influence how quickly metal reaches thin sections, where metal begins to solidify, and whether the part can receive enough liquid metal while it contracts.
For a one-off hobby casting, perfect yield is far less important than reliable filling.
Our Wax Tree for Casting and Gating System in Casting guides explain these relationships in more depth.
Burnout and Mold Preparation Before Pouring
Burnout has two jobs.
The first is removing the sacrificial pattern. The second is preparing the refractory mold for molten metal.
Residual wax, polymer, moisture, or combustion products can all cause problems when hot metal enters the cavity.
The Investment Casting Institute notes that industrial shells are dewaxed before pouring and that residual wax is removed during subsequent heating.
The mold is also normally preheated before casting. ICI explains that mold preheating helps prevent molten alloy from freezing before the cavity has filled completely.
DIY casters should follow the burnout schedule specified for the actual investment material or printable pattern system they are using rather than copying a temperature schedule from an unrelated material.
Ordinary construction plaster should not be treated as a direct substitute for a purpose-made casting investment. Casting investment is formulated for the thermal cycle and mold conditions involved.
Common Problems in DIY Investment Casting
The first attempts often fail for reasons that are easy to misdiagnose.
Incomplete Filling
If part of the casting is missing, the metal may have frozen before it reached the end of the cavity. Thin walls, long flow paths, insufficient mold heat, insufficient metal heat, or poor gating can all contribute.
Gas, Ash, or Pattern Residue
Incomplete burnout can leave material inside the mold. Printed patterns can be particularly sensitive to burnout behavior because different polymers and resins expand, decompose, and leave residue differently.
Cracked Investment or Ceramic Shell
The refractory mold must survive pattern removal and metal pouring. Excess pattern expansion, weak investment, incomplete drying, or unsuitable handling can create cracks that later fill with metal.
Ceramic or Investment Inclusions
Loose refractory material can break away and become trapped in the metal. The ICI defect atlas identifies mold material as one source of non-metallic inclusions in investment castings.
Shrinkage and Porosity
A mold can fill completely and still develop internal voids as the alloy solidifies. Heavy sections that remain hot after surrounding areas freeze are especially susceptible to feeding-related shrinkage.
Our Investment Casting Defects guide explains how these defect mechanisms differ.
Safety Risks in DIY Investment Casting
DIY investment casting combines several hazards that should not be treated as ordinary workshop inconveniences.
Molten metal can cause severe burns, and moisture near molten metal is particularly dangerous. OSHA has documented serious and fatal foundry explosions caused when water contacted molten material and rapidly turned to steam.
Everything that may contact molten metal—including crucibles, molds, tools, and the working area—needs to be kept appropriately dry.
Burnout also produces fumes and hot gases. Pattern materials should only be burned out with ventilation suitable for the material being used.
Ceramic and investment materials introduce a different hazard: fine refractory dust. NIOSH identifies foundry work as a potential source of respirable crystalline silica exposure and links silica dust to serious lung disease.
A casting workspace therefore needs more than gloves and safety glasses. Heat-resistant PPE, face protection, noncombustible surroundings, suitable ventilation, dust control, dry materials, and equipment designed for molten-metal work are basic requirements.
A garage attached to living space is not automatically a suitable foundry simply because a small furnace physically fits inside it.
When DIY Investment Casting Makes Sense
DIY investment casting is most useful when the purpose is learning, artistic work, jewelry, experimentation, or producing a small number of non-critical parts.
It can also be an effective way to understand why pattern design, gating, burnout, mold temperature, and solidification matter. A successful one-off casting teaches more about the process than simply reading a flow chart.
The limitations become more important when the part needs repeatable dimensions, certified alloy chemistry, controlled heat treatment, internal NDT, pressure integrity, or dependable batch-to-batch consistency.
Production quantity matters too. Making ten experimental castings by hand can be reasonable. Repeating the same manual shell, burnout, melting, and finishing operations hundreds or thousands of times is a different manufacturing problem.
Safety-critical components should not rely on an uncontrolled DIY process simply because the finished surface looks good.
DIY Investment Casting vs. Industrial Investment Casting
The basic physical principle is the same at home and in an industrial foundry, but the amount of process control is very different.
At YTD, repeat production normally starts with engineered tooling and controlled wax patterns. Patterns are assembled into defined trees, followed by our silica-sol ceramic-shell process.
Tooling, shell building, melting, heat treatment, machining, and inspection are planned as one production route. For suitable difficult parts, casting simulation can also be used during process development to evaluate filling and solidification before production is finalized.
Prototype projects do not always need hard tooling. We can use 3D-printed sacrificial patterns for suitable low-volume development work, then move to conventional wax tooling once the geometry is stable and repeat quantity justifies it.
That is often the natural dividing line between DIY and professional investment casting: the process stops being an experiment and becomes a repeatable manufacturing system.
Final Thoughts
DIY investment casting is practical when the goal is learning, jewelry, art, prototypes, or a small number of non-critical metal parts.
The challenge is not simply melting metal. Pattern quality, gating, mold material, complete burnout, mold temperature, alloy behavior, and safety all affect the result.
Start with a manageable part and a casting system designed for the material you are using. When repeatability, demanding alloys, certification, or critical performance become part of the requirement, the process has moved beyond ordinary DIY casting.
FAQs
Can You Do Investment Casting at Home?
Yes, small-scale lost-wax casting is widely practiced by jewelry makers, artists, and hobby foundries. It requires dedicated mold preparation, burnout, metal-melting equipment, ventilation, PPE, and a workspace appropriate for molten metal and refractory materials.
Can I Use a 3D-Printed Pattern Instead of Wax?
Yes. Sacrificial printed patterns are used in both hobby and industrial investment casting. The print material must be compatible with the burnout and mold system because residue or excessive thermal expansion can damage the mold.
Do I Need a Vacuum Casting Machine?
Not for every investment casting. Small jewelry systems often use vacuum or centrifugal assistance to fill fine details, while larger investment castings can use gravity pouring. The appropriate filling method depends on part size, alloy, gating, and section thickness.
Can I Use Ordinary Plaster of Paris for Investment Casting?
Purpose-made casting investment is the safer technical choice. Casting investment is formulated for mold strength, permeability, burnout, and high-temperature service. Ordinary construction plaster should not be assumed to provide the same behavior.
Can I DIY Investment Cast Stainless Steel?
Typical home setups are poorly suited to stainless steel. Its melting and pouring requirements are much higher than aluminum or jewelry alloys and require more capable furnaces, refractories, crucibles, pouring equipment, and process control.
Is Lost-PLA Casting the Same as Investment Casting?
It uses the same expendable-pattern principle. Instead of wax, a 3D-printed polymer pattern creates the cavity. The mold and burnout process must be compatible with the printed material.